Showing posts with label Suite showcase. Show all posts

Thursday, November 9, 2023

Suite Showcase no. 21 - Joy of Christmas

Hello and welcome back.

Can you believe it's November already?! That means that this Suite Showcase is focusing on Christmas using the Joy of Christmas Suite.
For my first card, using traditional Christmas colours, I pulled out the foiled specialty designer series paper and added it to a matting layer of Basic White but only so it covered 3/4 of the page. To cover the join, I die cut the frame from the Christmas Classics dies in Shaded Spruce and die cut the inner label for the sentiment. To fill out the foliage, I added some of the individual dies cut from the gold more dazzle paper and Cherry Cobbler. The sentiment was also stamped in Cherry Cobbler. 


This was all then added to Cherry Cobbler matting layer on to a Shaded Spruce card base. To complete the card I added some embellishments from the Iridescent Adhesive-Backed discs.


For my second card, I stuck to the traditional colours and a similar layout. I picked from the DSP in the Suite. I used the Shaded Spruce check as a matting layer and selected one of the foliage printed sheets to cut a 1 1/4" strip that is the same width as the card base. I layered this on some gold Fine Shimmer paper, that can be found in the clearance rack. The sentiment was stamped on the die cut label from the die set in Real Red. The 'merry' was stamped in Shaded Spruce on the shimmer paper and trimmed this to size with my snips.


I cut the same foliage frame as the previous card but this time, I cut it from Real Red cardstock. I then die cut some of the leaves from the Fine Shimmer paper and attached to the back of the sentiment panel. I laid some Gold and Vanilla ribbon looped on the card base and added the sentiment panel over the top on dimensionals. And completed with adding some gold Metallic Enamel Effects randomly.


For my third card, I changed everything and pulled in Highland Heather and Pool Party. I masked off a strip on some Basic White and stamped the foliage in Pool Party, Highland Heather and Smoky Slate. I stamped the sentiment and then using the Basic Black Stampin Write Marker, I drew lines to the highlight it.

Before adding this panel to the Highland Heather card base, I ink blended the edges with Highland Heather. This was adhered using our multi-purpose liquid glue.

I cut a matting layer of Pool Party and ran this through my Cut 'n' Emboss machine in the new Snowflake Sky 3d embossing folder. This is one of my absolute favourite embossing folders! The stamped panel was then added to the Pool Party layer using dimensionals. The card was then finished by adding a bow in the Silver & White ribbon and more of the Iridescent Adhesive-Backed Discs.


I hope you like the cards, I'm going to have more of a play with this suite. Why don't you head over to The Inkspirational Crafter, to see what Alison has been making with it. See you next time!

Shop Online

Shop online with me and use my online shopping code (W6HZ4HR4) at checkout to receive a free gift from me the following month. There are lots of things to choose from within the newly released September - December Mini Catalogue. You can view the catalogue by clicking the image below.


And if your order is going to be more than £99, why not consider joining my team? All you have to do is purchase a starter kit for £99, by choosing any items you want from the catalogue, to include in your and receive £130 worth of products.

Whether you want to get all the ink pads, add the cut 'n' emboss machine or take advantage of demonstrator only pre-orders from the new annual catalogue, the choice is yours! In the starter kit, you will receive a free business supplies pack but it's your choice if you want to be a hobby demonstrator and enjoy the 20% minimum discount off all future orders or if you want to start your own business. For more details click on the join my team link on my blog.


Tuesday, October 10, 2023

Suite Showcase no.19 - Them Bones

Hello and welcome back!


This month’s Suite Showcase is featuring Them Bones. I love Halloween, although I don’t normally make cards for the holiday, but with this suite, I just couldn’t resist! 

Monday, August 21, 2023

Suite Showcase 16 - Delightfully Eclectic Adhesive-Backed sequins


Hello, hello! How are you?  

Today, I'm sharing with you the latest Suite Showcase - Delightfully Eclectic. This is a showcase with a difference, because the only thing in this 'suite' is the designer series paper. It's a whopper of a pack - 48 pages in total, all double sided with all sorts of themes and patterns that are all 12" x 12". That means it will pretty much go with whatever you already have in your stash.

Wednesday, June 21, 2023

Suite Showcase 12 - Bright & Beautiful

Hello and welcome back!

Can you believe it’s nearly the end of June already and today is the longest day of the year?! This year is just flying by.

For today’s Suite Showcase, we’re using the Bright and Beautiful suite. I’ve made 3 cards for you today. Honestly, there’s so much that can be done with this whole suite, I could have kept going. And the great thing about this suite is that there is also Memories & More, card pack and envelopes available so they all coordinate. 

For my first card today, I used a standard size card base and then added a strip of designer series paper (DSP), a smaller strip of gold Be Dazzling specialty paper and a piece of Basic White cardstock that measures the full height of the card and 3 1/2 inches  wide. 


I then stamped each of the balloons in different colours - Lemon Lime Twist, Azure Afternoon and Berry Burst and added the string for each in Memento Black. I think it turned out cute and it’s really straight forward to make. I did put the stamped layer on dimensionals to give the card some interest. I stamped the sentiment in Berry Burst, on a scrap piece of Basic White and trimmed to size, bannering one end. To finish the card off, I used our new metallic enamel effects in gold.


For my second card, I decided to change things up and create a DL card. The card base is 8” x 8” scored in half on one side at 4”.  I stamped the largest balloon and tassels in Daffodil Delight, Lemon Lime Twist and Azure Afternoon. Then using the same colours, I stamped the streamers randomly in the background.  


I then die cut 3 balloons from our Vellum Basics DSP and Vellum cardstock. On the Vellum cardstock I heat embossed in copper, the happy birthday sentiment. And added a bow using the white basic twine. To finish, I used the copper metallic enamel effects randomly across the card.

Then finally, I decided to change things up again for my third card by creating a square card base in Lemon Lolly measuring 11 1/2” x 5 3/4”, scored in half on the long side at 5 3/4”. I used a matting layer measuring 5 1/2” square. To this I added the remainder of the DSP from the first card, cut to 5 1/4” by approximately 2” and adhered this to the white layer. I then chose another piece of DSP cut to 5 1/4” by 4 1/2” and added a slither of Berry Burst, top and bottom to this and adhered this on to the layer.

I die cut the stars from Lemon Lolly, Berry Burst and Pretty Peacock. The tag was die cut from Basic White and the sentiment was stamped in Pretty Peacock. To finish the card off, I added a bow using the Gold & Vanilla ribbon with some extra tails from White Basic Twine and Adhesive Backed Sequins Trio.


This is such a fun set, I hope you like my cards. Why not head over to see what Alison has been making at The Inkspirational Crafter.

If you would like to purchase any of the items I used today, please see the link at the bottom of this page.

SHOP WITH ME

Shop with me in June and use my host code to receive a free gift from me. Click here to shop using my host code, KUUP7JFD.

And if your order is going to be more than £99, why not consider purchasing a starter kit. In the month of June, when you purchase the completely customisable starter kit for £99, you will receive £154 worth of products! All completely yours to choose. For more information click here.

XXXXXX

Wednesday, June 7, 2023

Suite Showcase no.11 - Inked Botanicals

It's all about Inked Botanicals in the first Suite Showcase of June.
June! Can you believe it?! But how nice it is, to have some nice weather.

Welcome to the first Suite Showcase of June where we're focusing on the Inked Botanicals Suite. This is a beautiful suite and I've so enjoyed having a play with it, although I must admit, I'm not a fan of the punches so I didn't purchase them. But the suite is still just as gorgeous without them.

The colours in the suite are Lost Lagoon, Petal Pink, Crushed Curry and Calypso Coral. So for my cards, I've stuck to 3 of the colours:


For my first card, I thought I'd attempt to keep things simple, so on a piece of Basic White, I stamped the tall flowers in Lost Lagoon, the leaves in Calypso Coral and the individual flower in Crushed Curry. I stamped the sentiment in Lost Lagoon also.

I mounted this on dimensionals onto a sheet of the designer series paper from the suite. And this was then adhered to a standard size Lost Lagoon card base. 


To finish the card off, I added a bow using the new Lost Lagoon ribbon and Lost Lagoon gems from the Tinsel Gems embellishments.


For my next card, I decided to step things up. I cut a piece of the DSP to measure 10.1cm x 14.5cm, before I adhered this to the Crushed Curry card base, I stamped on a piece of Basic White measuring 5cm x 14.5cm. 

I stamped the tall flowers in Calypso Coral, the leaves in Lost Lagoon, and the flower buds in Crushed Curry. Then before I stuck this to the DSP, I embossed it using the brand new Exposed Brick 3d embossing folder. Once I glued this layer to the DSP, I wrapped a piece of Lost Lagoon ribbon around it and added a bow. 


I stamped the sentiment on a scrap piece of Basic White in Calypso Coral. Once cut to size, I tapped each side onto my Calypso Coral ink pad, to give it a bit of an edge. 

This was then adhered using dimensionals. I finished the card off with some more of the Tinsel Gems.


For my third and final card today, I cut a piece of Basic White cardstock to 13.1cm by 9cm. I ink blended Calypso Coral, Crushed Curry and Lost Lagoon. Once I'd done this, I then used one of the masks from the new Foursquare Decorative Masks, and blended lightly in Lost Lagoon over the ink blending.


Once this was done, I stamped the tall flowers in Memento Black.  I wrapped some black and white gingham ribbon towards the bottom. Stamping the sentiment in Lost Lagoon on Basic White, I punched this out using the smaller of the Double Oval Punch. And punched the large oval in Basic Black cardstock. Adding this over the ribbon, I added a bow in the same Lost Lagoon ribbon as before. I adhered this to a layer of Basic Black, measuring 13.4cm x 9.3cm, and then adhered this using dimensionals onto a Lost Lagoon standard size card base.


I love how the black really pops on this card. And of course, I finished the card as before with the Tinsel Gems.

I hope you like the cards. Head over to see what Alison has been making with the suite at The Inkspirational Crafter. Until next time, take care!

Shop online with me

Use my online shopping code at checkout to receive a free gift from me the following month. The code for June is KUUP7JFD.

For the month of June only, if you purchase a starter kit for £99, you receive £154 worth of products. And you can choose ANY items you want across the catalogue and online, including pre-order items.

Whether you want to get all the ink pads, add the cut 'n' emboss machine or take advantage of demonstrator only pre-orders from the new annual catalogue, the choice is yours! In the starter kit, you will receive a free business supplies pack but it's your choice if you want to be a hobby demonstrator and enjoy the 20% minimum discount off all future orders or if you want to start your own business. For more details click on the join my team link on my blog.

Want to recreate what I've made? Here's a list of the products I used:


Sunday, May 21, 2023

Suite Showcase no. 10 - Countryside Inn

Hello, hello! Can you believe we're nearly at the end of May already?! Time is flying.

For the second suite showcase of the month, I'm featuring Countryside Inn. This is a fab suite that includes a stamp set, dies, designer series paper (DSP) and embossing folder. The embossing folder even lines up beautifully with one of the papers to allow you to emboss the printed design. I haven't quite managed to get all of the suite yet, so for today's offerings, I'm showing you how the DSP can be combined with another stamp set, this time it's Tow-Tone Flora (one of my favourites) with sentiments from Something Fancy.

For my first card, I kept things fairly simple. I selected a page of DSP with the trees on and cut to standard matting layer of 10.1cm x 14.5cm. I then cut this layer down so one part is larger than the other. I reversed the DSP so there is a contrast. I lined up the two pieces and adhered together on the back side using some tear and tape. To cover the join, I added some Night of Navy ribbon and adhered to the Night of Navy standard card base, measuring 14.85cm x 10.5cm.


From Something Fancy, I selected the sentiment and in Night of Navy, stamped it on Basic White. I die cut this using the second largest label die from the Something Fancy dies. This was adhered over the ribbon on dimensionals. 

Using the Two-Tone Flora stamp sets, I stamped the detailed stamp for both the large flower and a smaller one in Misty Moonlight and completed the flowers by stamping the block stamp in Boho Blue. The leaves were stamped in Balmy Blue. I die cut them all out and adhered them to the card using a combination of liquid glue and dimensionals. To finish the card, I added some blue gems from the Adhesive-Backed Solid Gems.


For my second card, I created a book fold card. The card base measures 10.5cm x 29.7cm scored at 14.85cm and 18cm. I tied some Night of Navy ribbon between the two score lines and then glued that section down. This creates the book fold. I selected some DSP and layered on Basic White to fill the 'spine' and the remaining section of the front. 


I stamped 3 of the large flowers in a combination of Misty Moonlight/Night of Navy, Misty Moonlight and Boho Blue. The leaves were also stamped in Boho Blue and Night of Navy. I die cut two circles using the Stylish Shapes Dies in Night of Navy and Basic White. I layered these up and then adhered the flowers on the circles. 


For the sentiment, I die cut a banner shape also from Stylish Shapes Dies and white heat embossed (from Something Fancy stamp set). Before adhering the sentiment on top of the flowers, I added some white twine in a faux bow. To complete the card, I added some of the blue gems, the same as the previous card.


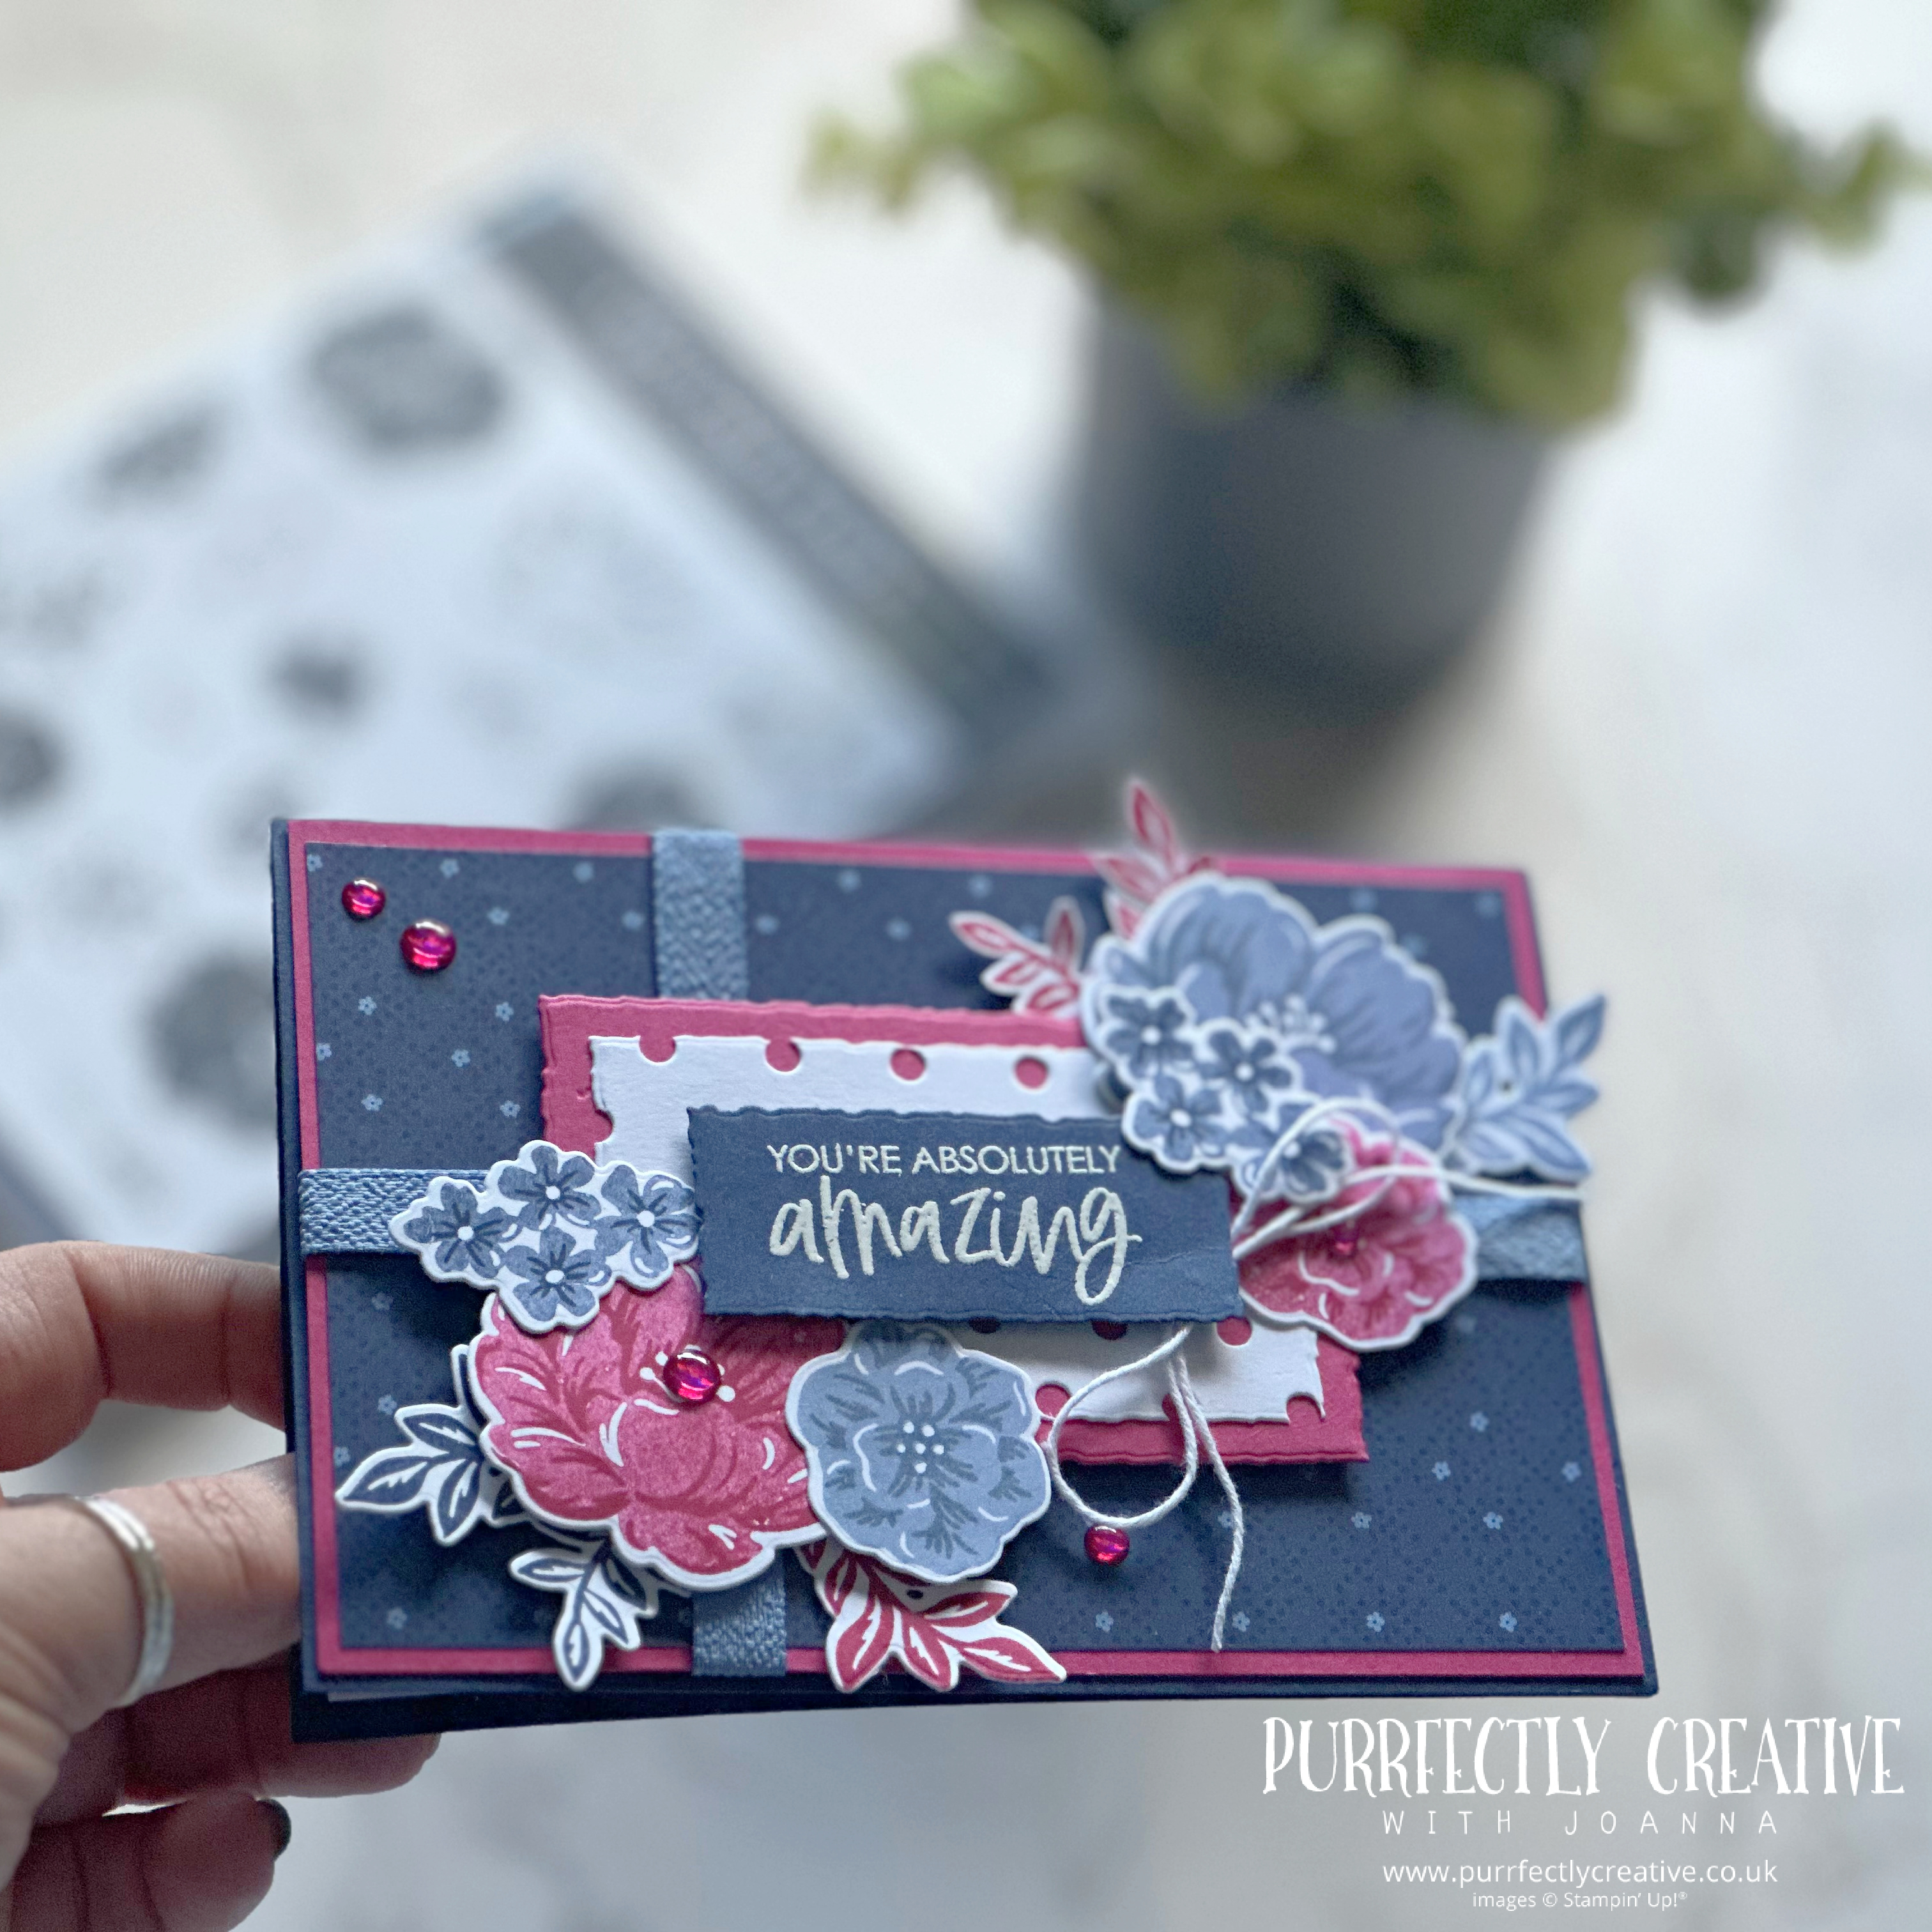
For my final card, I decide to throw the kitchen sink at it hehe. On a Night of Navy standard card base, I added a layer of Melon Mambo and then a layer of DSP, reducing each down by 4mm each time. I wrapped some Boho Blue textured ribbon in two directions, similar to wrapping a present. With the Deckled Rectangle dies, I die cut the fourth smallest from Melon Mambo cardstock. In Basic White, I die cut using the Dots & Spots die; from this die cut a piece using the third smallest die from the Deckled Rectangles and adhered using liquid glue to the Melon Mambo layer.


I stamped and die cut a combination of large, small and cluster flowers in Boho Blue/Misty Moonlight and Melon Mambo 1st & 2nd generation. The leaves were also stamped in Night of Navy, Boho Blue and Melon Mambo. For the sentiment, I white embossed on Night of Navy. I adhered the sentiment on dimensionals to the Melon Mambo and Basic White layer. Then, using liquid glue, I framed the sentiment with the flowers and leaves. I tucked a bow from white twine under the sentiment under one corner and finished the card with some of the pink embellishments from our Glossy Dots Assortment.


I think this is my favourite card just because of the pop of pink. Thanks for stopping by, I really hope you like what I've created.  Head on over to see what Alison has been making at The Inkspirational Crafter. 

Shopping with me


Shop online with me and use my online shopping code 7HKPGXFK at checkout to receive a free gift from me the following month.

And if your order is going to be more than £99, why not consider joining my team? All you have to do is purchase a starter kit for £99, by choosing any items you want from the catalogue, to include in your and receive £130 worth of products.

Whether you want to get all the ink pads, add the cut 'n' emboss machine or take advantage of demonstrator only pre-orders from the new annual catalogue, the choice is yours! In the starter kit, you will receive a free business supplies pack but it's your choice if you want to be a hobby demonstrator and enjoy the 20% minimum discount off all future orders or if you want to start your own business. For more details click here to join my team.


Tuesday, February 21, 2023

Suite Showcase no.4 - Regency Park


Hello! Welcome back to my blog and the fourth instalment in the Suite Showcase collaboration with Alison at The Inkspirational Crafter.

Today, we're showcasing the Regency Park suite. This suite is gorgeous and includes 2 stamp sets - 1 with dies and 1 with a punch. Both stamp sets feature two step stamping so you can stamp the outline in one colour, and then stamp the leaves and flower inners in a different colour if you want to. 


My first card, I've kept simple using the Petal Park stamp and punch from the suite. So, I stamped the leaves first on a layer of Basic White. I decided to use my Stamparatus to stamp the leaf images. The outline was stamped in Garden Green and then the filler was stamped in Granny Apple Green. I decided to keep the sentiment simple and stamped 'Thanks' from the Sentimental Park set, straight onto the Basic White Layer using my Stamparatus to make sure I got it straight. And, the best thing about using your Stamparatus, you could easily batch make these cards, which is perfect if you have a number of cards to make.

On a piece of scrap, I stamped the flower outline in Sweet Sorbet (full strength) and the filler I stamped off Sweet Sorbet so it was second generation. Then I punched them out. I love how quick and easy a punch is!

Before adhering the flowers to the card, I laid them out where I wanted them, and then used the small leaf stamp to add some extra foliage under them. 

I adhered the flowers to the card using mini dimensionals and glued this to layer of Sweet Sorbet. This was all then added to a Thick Basic White card base and I finished off with a linen thread bow and a combination of iridescent rhinestones and 2022-2024 matte decorative dots. 


For my second card, I used some of them designer series paper (DSP). The colours in this DSP are gorgeous and I really struggled to pick some to start with because they're all just so nice! 


I cut two pieces of DSP to match a basic layer for the card base. Then on both pieces, on the short side, I cut off a strip at 1 1/2". This allows to make 2 cards at the same time. I then laid a strip of the DSP that I trimmed and one of the larger pieces left (approx 2 1/2") onto a basic layer of Basic White ensuring that the DSP butted up against each other. I then laid a strip of Night of Navy ribbon from the suite over the join. Then I went to town on die cutting the little flowers from the Sentimental Park dies out of a range of colours - Mango Melody, Balmy Blue, Night of Navy and Petal Pink. I also die cut the largest label die with the flower frame in Vellum and then I die cut the label die in Balmy Blue. On the label die, I stamped the sentiment using a combination from the stamp set. This was all layered onto a Mango Melody card base.


I layered the label die into the vellum frame and added some of the die cut flowers around the frame. To finish off, I made a faux bow using the Night of Navy ribbon and wrapped linen thread around this and tied a knot and bow and then tucked this under the sentiment. I completed the card with some iridescent rhinestones.


For my third and final card for today (although I could have kept going), I pulled in a couple of extra items - Framed Florets dies and the new Cane Weave 3D embossing folder.


I decided to use some more of the current In Colours, so I made a card base of Tahitian Tide, with a base layer of Starry Sky. This was embossed using the Cane Weave 3D embossing folder, this is turning out to be a new favourite of mine. The detail is just gorgeous!


From a piece of Basic White, I die cut a couple of the frames from the Framed Florets dies. The largest frame cuts the outer decorative section as well as a more simple layer at the same time. I cut this frame from DSP also, but in the end, I felt it would be too fussy with all the images. I then die cut the smallest frame from these dies in Basic White, which gave me both an outer decorative frame as well as the solid inside. On the small solid piece, I stamped the filler leaves in Granny Apple Green from the Petal Park set, I added the flower fillers also in Sweet Sorbet randomly around the edge of this layer and added the small leaf outline also in Granny Apple Green. On a scrap piece of paper, I stamped the flowers in Starry Sky both full strength and second generation.


I then decided that the middle layer was a bit too white, so I pulled out the hash stamp from the Sentimental Park set, in Tahitian Tide randomly around the edge. I adhered the decorative frame using multipurpose glue and then the second layer was added using dimensionals. The final layer was adhered using multipurpose glue. I then laid the flowers out to decide how I wanted them to look and then adhered them using a combination of glue dots and dimensionals. To finish the card off, I white heat embossed a sentiment onto Tahitian Tide and then trimmed down. I added a linen thread bow and completed the card with some iridescent rhinestones.

I hope you like this card, there are so many possibilities when using just the sentiments from Sentimental Park.

Head over to the lovely Alison at The Inkspirational Crafter to see what fantastic projects she's made using the suite. See you next time!

If you want to recreate these projects, the products are listed below.

Shop with me

Shop online with me and use my online shopping host code at checkout to receive a free gift from me the following month

And if your order is going to be more than £99, why not consider joining my team? And, as it's Sale-A-Bration time, if you purchase a starter kit for £99, you can choose any items you want from the catalogue, clearance rack, pre-orders, new releases, you will be able to choose and receive up to £170 worth of products. Or if you would prefer, you could purchase the starter kit for £125, still receive £170 worth of products but you will also have the choice of one of our mini cut & emboss machines - either in the white or you could opt for the limited edition Boho Blue machine. But hurry, this offer only runs until the end of Sale-a-Bration on 28th February 2023. So don't miss out! For more details, click HERE.


Popular Posts